Yet another installing Kubernetes tutorial
I know, why yet another installing Kubernetes tutorial? For a research project, I need to get a Kubernetes cluster running on a set of virtual x86-64-nodes as well as on a set of Nvidia jetson cards in the same cluster. I found no tutorial that covered this exact use-case (strange, I would have thought this would be common-place), so I am using this as “notes to myself” so that I can recreate and possibly automate the process in the future.
I am using this tutorial from Tutorials point as inspiration and this tutorial from vitux, and this.
For the installation on the Jetson cards, this tutorial was crucial.
Preparing the nodes
My cluster consists of three x86-64 nodes running Ubuntu 20.04.1 LTS and three Nvidia Jetson Nano Devloper cards running Ubuntu 18.04.5 LTS. The x86-64 nodes are vmWare virtual machines with two cores each and the Jetson cards have each a quad-core ARM Cortex-A57 processor and an NVIDIA Maxwell architecture with 128 NVIDIA CUDA® cores.
Make sure each node is updated and upgraded with the latest patches.
sudo apt update && sudo apt upgrade
Setting up the Kubernetes nodes
Set up docker
This turned out to be more difficult than expected. I tried various sources and at the end, what worked was the following:
sudo apt update
sudo apt install apt-transport-https ca-certificates curl software-properties-common
curl -fsSL https://download.docker.com/linux/ubuntu/gpg | sudo apt-key add -
sudo add-apt-repository "deb [arch=amd64] https://download.docker.com/linux/ubuntu focal stable"
sudo apt update
sudo apt install docker-ce=5:19.03.14~3-0~ubuntu-focal
Nore that you need to make sure docker uses systemd as cgroup driver as follows.
Create file (if it does not exist) /etc/docker/daemon.json and put the following in that file:
{
  "exec-opts": ["native.cgroupdriver=systemd"],
  "log-driver": "json-file",
  "log-opts": {
    "max-size": "100m"
  },
  "storage-driver": "overlay2"
}
For the Nvidia jetson nano cards, the contents of /etc/docker/daemon.json should instead be:
{
    "default-runtime": "nvidia",
    "runtimes": {
        "nvidia": {
            "path": "nvidia-container-runtime",
            "runtimeArgs": []
        }
    },
    "exec-opts": ["native.cgroupdriver=systemd"],
    "log-driver": "json-file",
    "log-opts": {
        "max-size": "100m"
    },
    "storage-driver": "overlay2"
}
Restart docker service:
sudo service docker restart
Set up etcd
Note: this is only needed for the master/control-plane.
sudo apt install etcd etcd-client
Set up kubernetes
curl -s https://packages.cloud.google.com/apt/doc/apt-key.gpg | sudo apt-key add
sudo apt-add-repository "deb http://apt.kubernetes.io/ kubernetes-xenial main"
sudo apt update
sudo apt install kubeadm
Check that kubeadm was correctly installed:
kubeadm version
kubeadm version: &version.Info{Major:"1", Minor:"20", GitVersion:"v1.20.2", GitCommit:"faecb196815e248d3ecfb03c680a4507229c2a56", GitTreeState:"clean", BuildDate:"2021-01-13T13:25:59Z", GoVersion:"go1.15.5", Compiler:"gc", Platform:"linux/amd64"}
Then turn of swapping:
sudo swapoff -a
sudo sed -i '/swap/ s/^\(.*\)$/#\1/g' /etc/fstab
Note: it was important in my case to use /swap/ as pattern matching, I tried / swap / and it did not work.
The first command above turns swapping off and the second one makes sure it is not turned on again at reboot.
Make sure each node has a unique hostname and that you remember which is the master. In my case I run this on the Kubernetes master:
sudo hostnamectl set-hostname k8s1-master
and this on each worker node:
sudo hostnamectl set-hostname k8s<n>-worker
where <n> is replaced with a numer (2,3 etc).
Start Kubernetes on the master node
Start Kubernets with:
sudo kubeadm init
If everthing goes well, you should end up with the following lines at the end:
Your Kubernetes control-plane has initialized successfully!

To start using your cluster, you need to run the following as a regular user:

  mkdir -p $HOME/.kube
  sudo cp -i /etc/kubernetes/admin.conf $HOME/.kube/config
  sudo chown $(id -u):$(id -g) $HOME/.kube/config

Alternatively, if you are the root user, you can run:

  export KUBECONFIG=/etc/kubernetes/admin.conf

You should now deploy a pod network to the cluster.
Run "kubectl apply -f [podnetwork].yaml" with one of the options listed at:
  https://kubernetes.io/docs/concepts/cluster-administration/addons/

Then you can join any number of worker nodes by running the following on each as root:

kubeadm join 10.xxx.yyy.105:6443 --token b0qc...lt \
    --discovery-token-ca-cert-hash sha256:b7ed95...d90b5b4f2b6f51814
Make sure you save the last command somewhere so that you can run it on the worker nodes.
You should do as it says and set up the configuration script:
mkdir -p $HOME/.kube
sudo cp -i /etc/kubernetes/admin.conf $HOME/.kube/config
sudo chown $(id -u):$(id -g) $HOME/.kube/config
Download and install the Calico networking manifest:
curl https://docs.projectcalico.org/manifests/calico.yaml -O
kubectl apply -f calico.yaml
Have a worker node join the Kubernetes cluster
Use the kubeadm command above to join a new worker to the cluster:
kubeadm join 10.xxx.yyy.105:6443 --token b0qc...lt \
    --discovery-token-ca-cert-hash sha256:b7ed95...d90b5b4f2b6f51814
Make use of the cluster
This is what I ended up with:
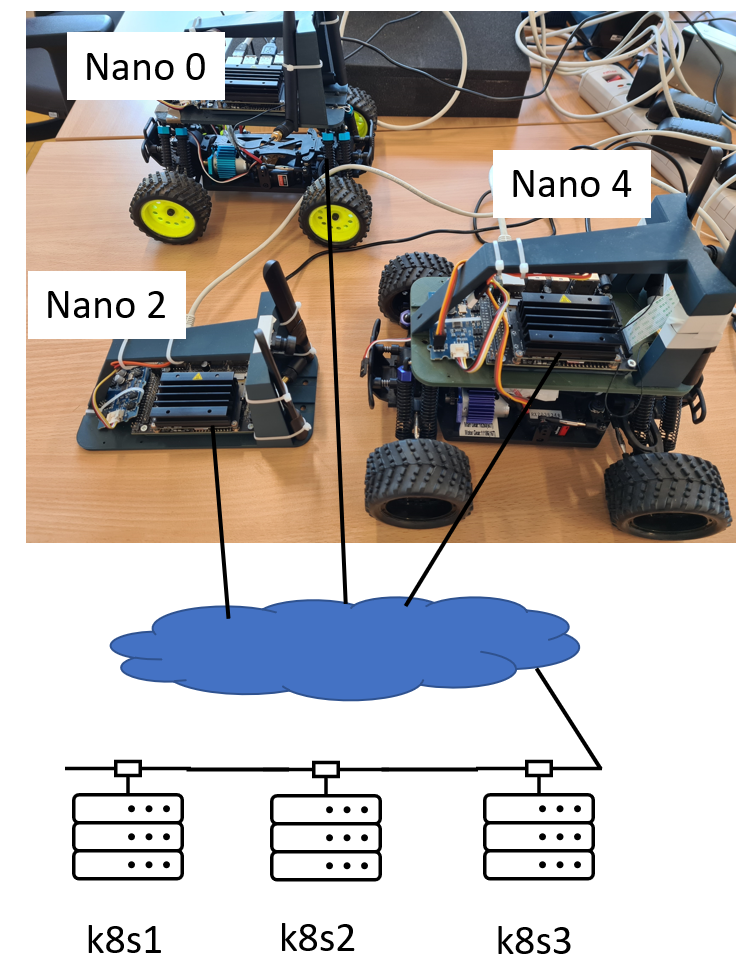
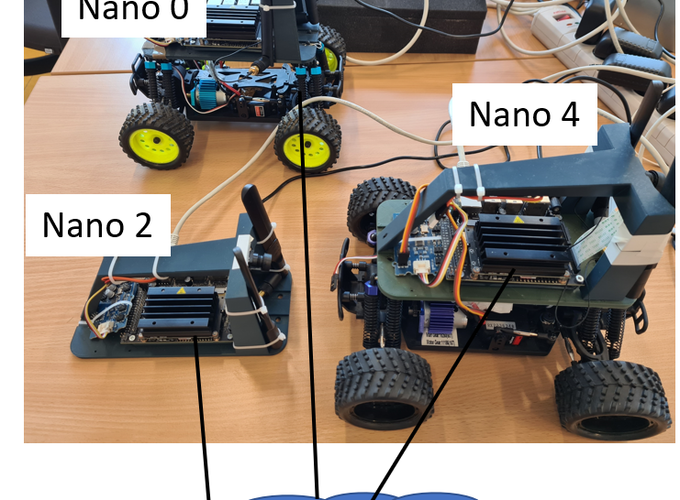
A heterogeneous Kubernetes cluster
Here you can see the three Nvidia Jetson boards. They are actually mounted on RC-car chassis to be used in autonomous vehicles courses, but I can make use of them as nodes in my Kubernetes cluster. The node marked k8s1 is the master node of this cluster. It and the other virtual machines are standard x86-64 nodes and the Nvidia nano cards, as mentioned, they are of ARM64 architecture.
This is the Kubernetes view of the cluster nodes:
$ kubectl get nodes
NAME           STATUS   ROLES                  AGE   VERSION
360lab-nano0   Ready    <none>                 20d   v1.20.2
360lab-nano2   Ready    <none>                 20d   v1.20.2
360lab-nano4   Ready    <none>                 20d   0.5.0
k8s1-master    Ready    control-plane,master   20d   v1.20.2
k8s2-worker    Ready    <none>                 20d   0.5.0
k8s3-worker    Ready    <none>                 20d   v1.20.2
They all run the v1.20.2 of Kubernetes except nano4 and k8s2 which instead run kurstlet which is a replacement of kubelet (the agent responsible for talking to the kubernetes master and receiving instructions on what containers to execute) and which can run WebAssembly/WASI modules instead of Docker containers. I will soon post a new blog post about running WebAssembly in Kubernetes in various ways.
Docker containers, which is by far the most common execution vehicle in Kubernetes, are architecture and OS dependent. On an x86-64-node with Linux, you can only run Linux containers compiled/built for x86-64. This is recognised automatically so when you deploy a manifest for running a container, only the matchine nodes are eligible.
Docker Buildx is, however, a docker cli plugin that comes to our rescue. In the best of worlds, you can build a multi-architecture docker container like this:
docker buildx build --platform linux/amd64,linux/arm64 -t matsbror/hello-arch:latest --push .
In this case, it’s a small Python flask app which returns some information about the environment in it. The cross-platform docker creation is pretty slow since it fires up a simulator of the ARM architecture (assuming you are on an x86-64 architecture) to do the building, but it works pretty painlessly, at least for interpreted languages like Python. For compiled languages like C++ and Rust it’s considerably more complicated.
The following manifest can be used to deploy this container:
apiVersion: apps/v1
kind: Deployment
metadata:
  name: hello-arch
  labels:
    app: hello-arch
spec:
  replicas: 1
  selector:
    matchLabels:
      app: hello-arch
  template:
    metadata:
      labels:
        app: hello-arch
    spec:
      containers:
      - image: matsbror/hello-arch
        imagePullPolicy: Always
        name: hello
        resources: {}
        terminationMessagePath: /dev/termination-log
        terminationMessagePolicy: File
      imagePullSecrets:
      - name: regcred
      nodeSelector:
        kubernetes.io/arch: arm64
        #kubernetes.io/arch=amd64
---
apiVersion: v1
kind: Service
metadata:
  name: hello-svc
  labels:
    app: hello-arch
spec:
  type: NodePort
  ports:
  - port: 5000
    nodePort: 30001
    targetPort: 5000
    protocol: TCP
  selector:
    app: hello-arch
It creates a deployment and a NodePort service which responds to port 5000. The nodeSelector key defines which architecture this container can run at. First we deply it with the arm64 specification.
$ kubectl apply -f hello-service.yaml
deployment.apps/hello-arch created
service/hello-svc created
After some time, the cluster has started the container on one of the arm64 nodes:
$ curl k8s1.uni.lux:30001
{
  "result": "Flask inside Docker!!",
  "system": [
    "Linux",
    "hello-arch-65d5b8f665-b8jdg",
    "4.9.140-tegra",
    "#1 SMP PREEMPT Tue Oct 27 21:02:37 PDT 2020",
    "aarch64"
  ]
}
As you can see it’s running on an aarch64 (same as ARM64) architecture with the 4.9.140-tegra kernel.
Let’s tear the service and deployment down and start with the amd64 architecture specification instead:
$ kubectl delete service/hello-svc deployment.apps/hello-arch
service "hello-svc" deleted
deployment.apps "hello-arch" deleted$

# change arm64 in the manifest to amd64

$ kubectl apply -f hello-service.yaml
deployment.apps/hello-arch created
service/hello-svc created

$ curl k8s1.uni.lux:30001
{
  "result": "Flask inside Docker!!",
  "system": [
    "Linux",
    "hello-arch-b7fb4c8ff-blkg8",
    "5.4.0-65-generic",
    "#73-Ubuntu SMP Mon Jan 18 17:25:17 UTC 2021",
    "x86_64"
  ]
}
Now the response indeed indicates that the same container runs on an x86_64 (same as AMD64) architecture.
Next time, I will explain why this is probably not a good idea when you have multiple architectures and show how WebAssembly might be part of the solution.